

If you spend any time lurking in homelab forums like r/homelab, you’ll see one piece of advice come up over and over: set up your own Active Directory domain as soon as possible. A domain controller gives you centralized account management, lets you enforce policies and settings across devices, and is a launchpad for way more advanced IT projects down the line. Honestly, it’s like the backbone of a real enterprise network, just shrunk down to fit in the spare room.
Truthfully, it’s something I should have done right after turning my old gaming rig into my first server. But, at the time, I just wanted to tinker with whatever caught my interest—I didn’t have a plan. Even though I work with Windows Server all day, I’d never walked through the full domain controller setup on my own from scratch. The closest I’d come was poking around with the Certificate Authority role, mostly by blindly following a how-to!
So, today was finally the day. I put on my “ITIL brain” (yes, it haunts me even at home), spent a few hours researching and documenting each step so Future Me can fix whatever I break, and sat down to spin up a shiny new virtual environment. My plan was simple: deploy a Windows Server 2022 domain controller, create an external virtual switch so it could actually talk to other devices, set up a Windows 11 Pro workstation to test future GPOs (and break things safely), and prep my trusty Veeam server to join the new domain. This post is more of a behind-the-scenes walkthrough than a step-by-step guide—but don’t worry, I’ll link to my documentation at the end for anyone who wants to try it out.
Getting Set Up: ISOs and Virtual Switches
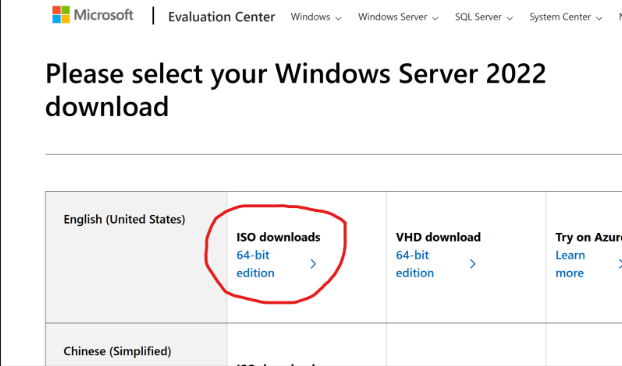
First up: downloading the tools. Microsoft makes it easy—just hop onto their Evaluation Center, grab the Windows Server 2022 ISO, and you’re good for 180 days (or up to 1080 days if you get creative with re-arms). Luckily, I already had a Windows 11 ISO on hand, but for anyone who doesn’t, here’s the official link.
While the server ISO downloaded, I headed into Hyper-V Manager to set up a new external virtual switch—essential for letting the VMs talk to other devices across my network. With the switch prepped, the ISO finished up just in time for the next phase: creating the actual domain controller VM. I gave it a minimal but adequate spec (4GB RAM, 60GB disk), knowing I can always bump things up if I need to down the road.
While the server ISO downloaded, I headed into Hyper-V Manager to set up a new external virtual switch—essential for letting the VMs talk to other devices across my network. With the switch prepped, the ISO finished up just in time for the next phase: creating the actual domain controller VM. I gave it a minimal but adequate spec (4GB RAM, 60GB disk), knowing I can always bump things up if I need to down the road.


Installing Windows Server and Basic Setup
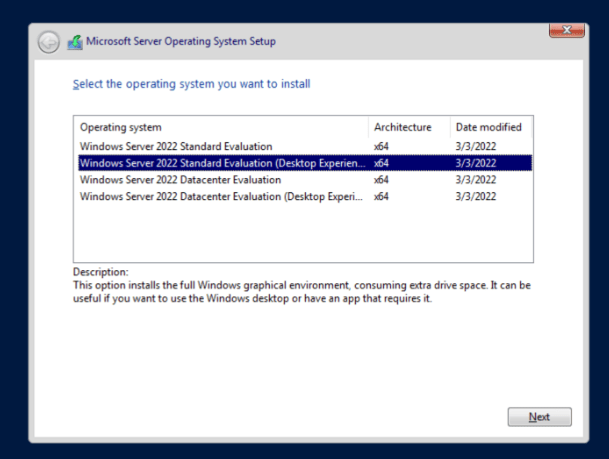
Watching JR-DC-01 pop up in Hyper-V was weirdly satisfying. I fired it up and started the server install, making sure to select the “Desktop Experience” option—no command-line only installs for me this time! After a quick custom install on my fresh disk, Windows Server was running in just a few minutes.
From here it was all about the admin basics: creating a strong password, running updates (which took forever—thanks, Microsoft!), and then popping into my firewall to check which IPs were free outside my DHCP pool. Once the server was up to date, I set a static IP so everything on my network stays predictable.
Adding the AD DS Role and Promoting to Domain Controller
With my new admin account set up and Windows fully updated (why do server updates always take so long?), I got ready to configure the server’s static IP. A quick check of my firewall showed which addresses were free outside the DHCP pool, so I set up a neat static IP for the new domain controller—no surprises with DHCP changes down the road.
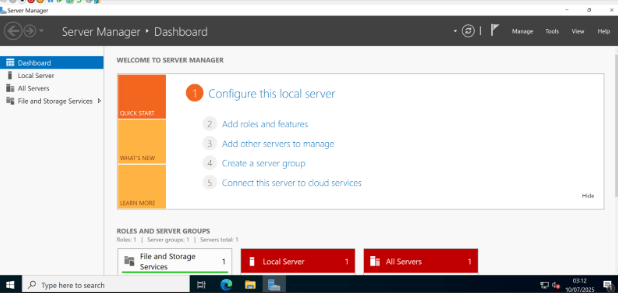
With networking sorted, I dove into Server Manager to tackle Active Directory. Installing the AD DS (Active Directory Domain Services) role turned out to be refreshingly simple: just click on “Manage,” choose “Add Roles and Features,” and select Active Directory Domain Services from the list. During the prerequisite screen, I deliberately left the DNS Server role unchecked—my UniFi firewall already handles DNS and I figured, why make things more complicated? (Spoiler alert: More on that later!) The installation zipped by in less than a minute.


Next up was promoting the server to a domain controller, the real heart of this whole exercise. The wizard was straightforward: I selected “add a new forest,” plugged in jr-network.local as my root domain name. After a few prerequisite checks, I hit “Install” and let Windows do its thing. After a quick reboot, I saw that familiar domain sign-in screen pop up. That first log-in with your shiny domain admin credentials feels pretty great—domain admin power, officially unlocked.
Setting Up the Testing Workstation
With the domain controller sorted, it was time to spin up a guinea pig: a Windows 11 Pro VM (4GB RAM, 64GB disk), with TPM enabled to make Windows 11 happy. The install was mostly straightforward, but here’s where I hit my first snag: Microsoft really, really wants you to use a Microsoft Account, opt in to every privacy setting (ironic), and subscribe to Game Pass and Office 365 along the way. I pressed “skip” so many times I started to think Skynet was judging me.

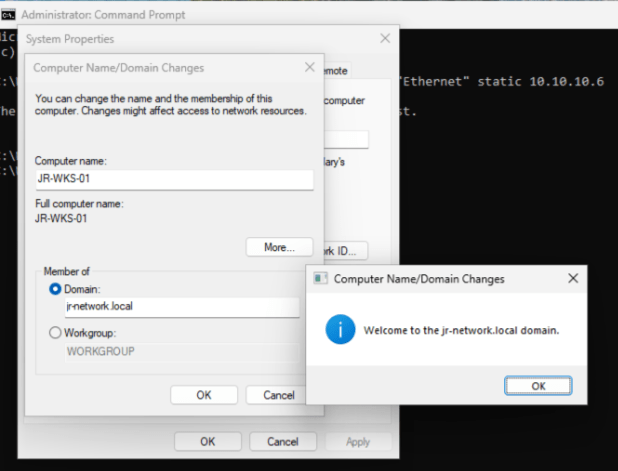
A small slip-up had me accidentally set up the device as “home,” but after sorting that, I logged into Windows and set about joining the workstation to my shiny new domain—until, of course, I ran smack into an error. Despite double-checking the spelling, network, and connectivity (all fine), it just wouldn’t join.
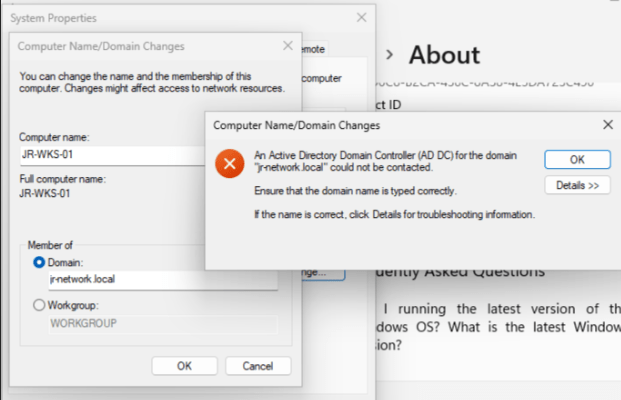
Oops, You Really Do Need DNS…
Classic learning moment: turns out, AD domain joins rely on DNS, and I’d skipped installing the DNS Role on the DC. Time for a quick detour—back to Server Manager, enable the DNS Server role, fast-forward through setup, and voilà: DNS was operational. After a DC reboot, domain join worked first time. Gotta love it when a fix is that clean.
The Not-So-Simple Part: The Veeam Server Saga
With my domain and test workstation finally communicating happily, I turned my attention to reconfiguring JR-VEEAM-01 to join the domain… only to find it was powered off and refusing to start. Because of course it was. I opened up the console and, instead of a login screen, got hit with a fresh error. Homelabbing, am I right? If you ever think everything’s going to go smoothly, the universe sends you a quick reminder.

Instead of squeezing that fix into this (already long) post, I’ve decided to save the Veeam adventure for next time. That’ll include troubleshooting whatever is going on, getting it attached to the domain, and setting up proper backup jobs for both the new domain controller and workstation.
Lessons Learned & The Road Ahead
Today, I managed to get a domain controller up and running, deploy Active Directory Domain Services and DNS, and prove out the basics of account and policy management on a test workstation. Even with a few detours, it’s been a solid step forward—and proof that you don’t need a complicated lab to learn real enterprise skills.
If you’ve read this far, thanks for sharing in my victories (and commiserating in my “facepalm” moments). I hope this gives you the confidence to try setting up your own domain, or at least assures you that bumps along the way are all part of the process. If you want a copy of my detailed documentation or want to see a deep-dive on any step, let me know in the comments!

Leave a comment